
FILLING THE SHADOWBOX
SECTION 3:
DYEING THE EGGS

In the Bunny Burrow Mr. & Ms. E.
Bunny are busy dyeing eggs that will be
hidden all over the world for children to discover on Easter morning. This is the subject of the third shelf in our
Easter Shadowbox project.

Copy & save to your computer. Set to print at 9" x 6.25" using best printer settings. Print onto matte presentation paper.
-----
The Background: Make a copy of the
background graphic onto matte presentation paper using your printer’s best settings. The shelf as seen measures 5” wide by 3 ½” high
by 2 ½: deep. Make any necessary size
adjustments so the graphic fits your shelf front to back and side to side.
Cut out the
graphic and test fit it into your shelf, from front to corner, across back to
corner and out to front. Use a quality glue stick to adhere graphic in
shelf.

The Flooring: Dried Sphagnum moss (craft store purchase) was used for the
flooring. I put a hand full in a bowl
and use scissors to cut it into smaller pieces for ease in applying. I applied a thick coating of Crafter’s Pick Ultimate glue to the
floor. I dumped the moss onto it and pressed it into the glue. After the glue had set a bit I used a wide
soft-bristled paint brush to “sweep” the excess moss off the floor. Bit of the moss were glued here and there on
the front edge of the shelf.

A sign hangs
from the back wall. Print the sign
graphic on bright white paper. Choose
which one you want to use and glue it to a piece matt board. Cut out.
Tint the edges to match the sign with water color pencils. Glue to back wall

The
Work Table: Cut a ¾” long segment of ¾” diam.
wood doweling for the tree trunk. Soften
a piece of Fimo (I used #703 stone effect color but any brown
color will work).and roll it flat and thin.
Paint the sides of the piece of dowel lightly with tacky glue and wrap the Fimo around it, cutting off the overlap on
sides and the excess on top and bottom.
Roll long carrot-shaped pieces of the Fimo and press to sides of the
trunk…7-8 of these root pieces should be about right. Smooth the roots to the side of the trunk and
let the pointed end bend out from the bottom….make each root a bit different. As you add the root pieces keep in mind that
they should not extend out from the edges of the table top when
assembled. Use a pointed stylus, or similar tool, to “scrape” the Fimo from top to
bottom to add texture. Use a flat, soft-bristled brush to gently
brush off any loose particles of clay.
Bake according to Fimo package directions. When the piece is cool antique it with a wash of half and half Delta Gel Stain
Medium and a dark brown acrylic paint.
If needed, paint your piece a medium brown before antiquing it.

To create the
table top; make a color copy of the
table-top graphic onto bright white
paper, using best photo settings.
Roughly cut out the picture and glue-stick
it to a piece of matboard or similar
thickness cardboard. Cut out around the
edges of the picture. Color the bottom
of the table top with water color pencil to slightly match the top of the
table. Use a dampened, dark brown water color pencil to color
the edges of the table top.
Glue table top
to the tree trunk base.

Copy & paste to your computer. Set to print at 2.75" x 1.58"
Print onto bright white paper at best printer settings
========
Egg Dyeing Supplies:

Eggs-
Using instructions found in Section One of the Shadowbox make lots of Fimo eggs, white and pastel.

Egg
dyeing Kit- Print
out the kit onto matte presentation
paper using best printer settings.
Cut out pieces. Score and fold on
all lines. Assemble the box top and lid
using a tacky glue. Insert the platform into the box. Use a 1/8” round paper punch to punch out six
rounds of colored paper; glue onto
platform as seen. Form an egg-dipper
from fine wire, using photo as a
guide. You may also choose to use a cut
out of the dipper diagram instead. Glue
dipper in place. If you are going to
make a dipper separate from the box, bend it up between the holder and handle. Cut out the holes in the Egg Holder. Fill egg holder with colored eggs, using a bit of glue to hold.
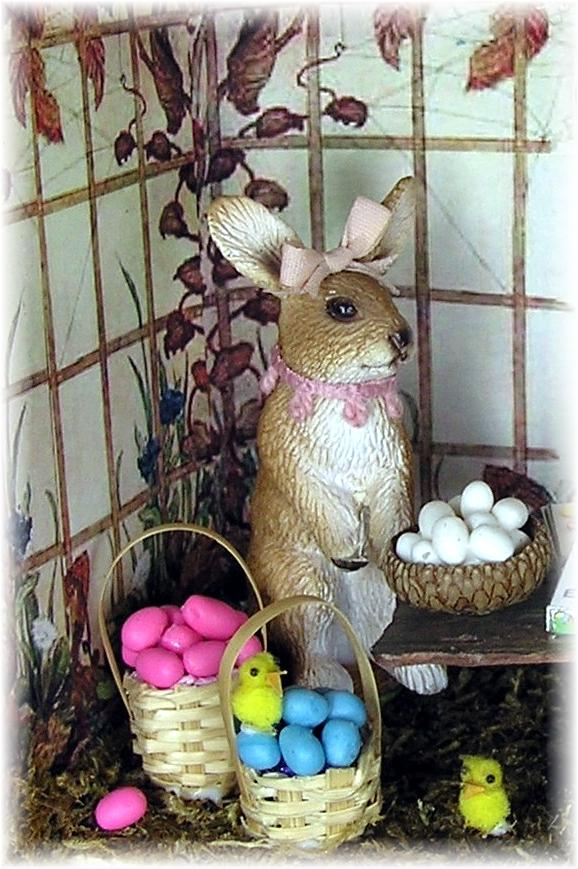
Un-dyed Eggs
are displayed in a bowl…I used a polished acorn cap for my bowl.

Glasses of Dye are made using Lite Brite pegs
from a child’s game. The pegs can be
purchased separately thru Amazon.com or toy stores. Cut ¼” sections from the large end; sand the
bottom flat if necessary. You may use
them as is or use a Dremel tool to router out the inside of the glasses, deep
enough to take an egg or just to enough to look like the glass is not full to
the top. Use clear nail polish to cover
any dull spots from cutting or router.

The Bunnies are
from Schleich and are sold separately for a few dollars each. They are quite detailed and very nicely
painted. They are about 1-7/8” tall to the top of their heads. I purchased mine from a local farm supply store. Amazon.com has them for a few more $$ than I
paid over the counter.
I antiqued them a bit with a
medium brown gel stain wash to accent their fur a bit more. I sliced thru both bunny’s hands with an
X-acto knife so they could hold things (watch your fingers…remember, always cut
away from yourselves!)..

For Mr. Bunny I made a
simple green felt beret to celebrate his artistic work. I hand sewed a running stitch around the
outside of a felt round and pulled it tight.
I cut a hole in the top to accommodate an ear. A tiny felt “stem” was glued on the top. A green bow-tie of silk ribbon is around his
neck. In his hand he holds a paint
brush.
Ms. Bunny wears a pink silk
bow on her head and a bit of vintage trim around her neck. She holds a spoon (Chrysnbon).

Baskets of dyed eggs sit on the ground and a few chicks (see the instructions in the first shelf instructions) have
found their way to the burrow to watch the artists.

Next we will fill the next shelf with a group of
Easter baskets full of goodies….hopefully in the next few days…Easter is
sneaking up on me,
Joann
Lovely! Thank you for another wonderful how to :) I'm especially impressed with the tree trunk idea.
ReplyDeleteWonderful Easter scene.
ReplyDeleteGreetings, Faby
Una escena preciosa, felicidades:)
ReplyDeleteSo lovely!
ReplyDeleteThanks for sharing. ;)
Lovely! I really like your scene.
ReplyDeleteMy goodness, your creativity is so impressive!! Using an acorn top for the bowl - very clever!! I admire your talent so much! Thanks for sharing.
ReplyDeleteMany mini hugs,
Jackie :D